Independent sourcing note: Coconut Bowls Supplier is an independent B2B sourcing desk — we are not a manufacturer, exporter of record, or freight forwarder. We curate verified Indonesian coconut-bowl makers (Bali & Java) and route your RFQ to a vetted production partner. MOQs, FOB prices, and lead times shown are indicative ranges [VERIFY by quote]. Food-contact compliance (e.g. FDA / LFGB) for US/EU import must be confirmed with the supplier and your own customs broker — this is general trade information, not legal, customs, or compliance advice. We may earn a sourcing commission on referred orders (referral disclosure).
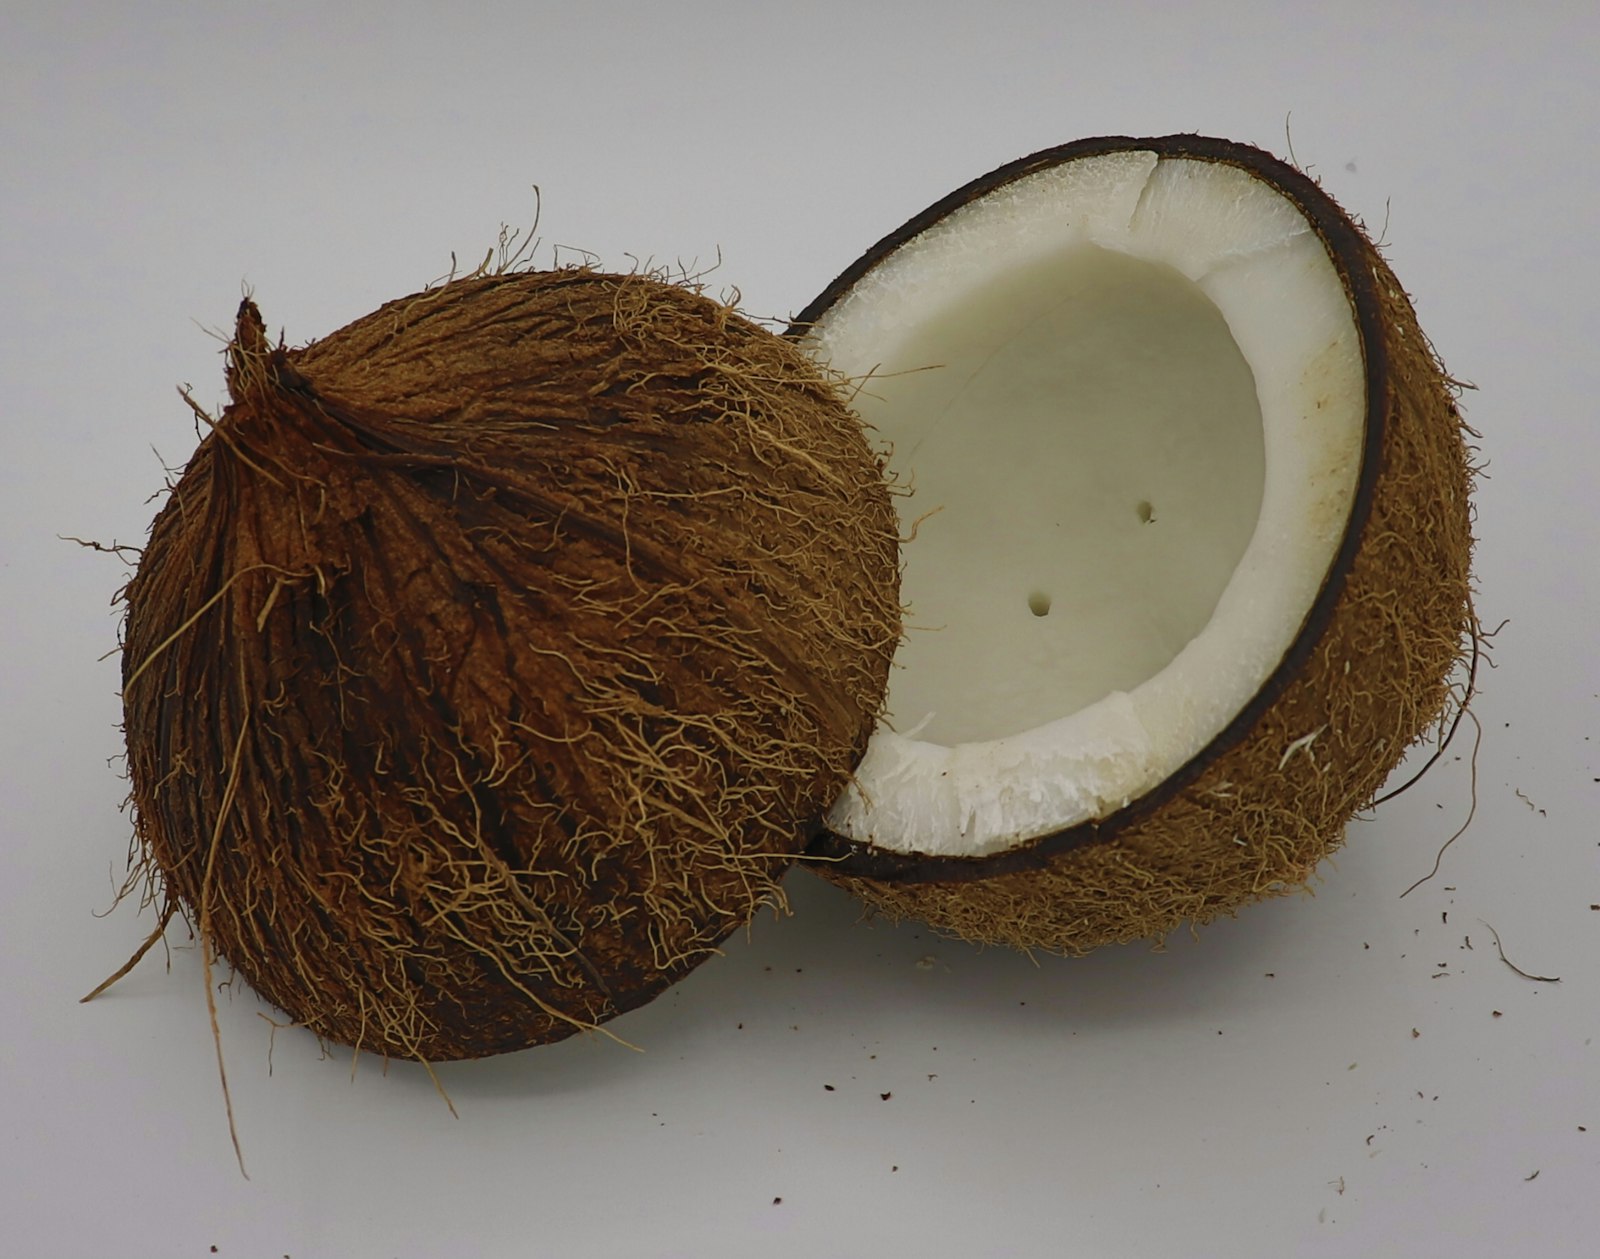
Coconut bowls are made from the hard outer shells of mature, brown coconuts — not young green ones. The distinction matters from the first step: a shell harvested too early is softer, thinner, and more prone to splitting once dried. The production process converts what would otherwise be a discarded agricultural shell into a food-contact vessel through a sequence of cutting, cleaning, drying, sanding, and finishing. It sounds simple. The details are where quality either holds together or falls apart.
This page walks the full coconut bowl production process from raw shell to finished product. Where the numbers are well-established, I say so. Where exact timing or temperatures are undocumented or workshop-specific, I say that too. If you are evaluating a supplier, the questions at the end of each section are the ones worth asking.
The Raw Material: Why Shell Maturity Is the Starting Point
A coconut passes through roughly 12 months of development on the palm. The young green coconut — the kind sold for its water in street markets across Southeast Asia — has a soft, thin shell that is not workable for bowls. By the time the coconut is fully mature and its outer husk has dried to brown, the endocarp (the hard inner shell) has densified into a material that takes sanding and finishing well. That density is what gives a finished bowl its weight, its natural sheen, and most of its resistance to cracking under normal use.
Mature shells also carry a harder, more uniform inner surface once the dried coconut meat is removed. On the workshop floor, you can tell an immature shell immediately: the wall is thin enough to flex slightly when squeezed, and the interior is pale and damp rather than firm and ivory-coloured.
Where the Shells Come From: The Byproduct Claim
Suppliers almost universally describe coconut bowls as made from “upcycled waste” or “agricultural byproducts.” The underlying logic is legitimate: Indonesia processes enormous volumes of coconuts for coconut water, meat, milk, oil, and copra each year — FAO data puts Indonesian coconut production at roughly 17.1 to 17.2 million metric tonnes annually, the largest in the world. The shells left after processing that material would otherwise be burned for fuel or composted. Turning them into bowls is, in principle, using something that would have been discarded.
The candid qualification: “plausible” is not “documented.” Verifying that a specific batch of shells came from a coconut-processing stream rather than from trees harvested specifically for bowl production requires feedstock documentation from the supplier. Ask for it. Most cannot produce it — which does not mean the claim is false, only that it is unverified marketing language until the paperwork exists. Our sustainability guide covers which eco claims hold up and which require documentation to defend.
Coconut Shell Bowl Manufacturing Steps
The sequence below represents established practice in Bali-based and Indonesian workshops. Step order is consistent; timing within each step varies by producer, shell condition, and production volume.
Step 1: Drain the Liquid
Even a mature brown coconut retains some liquid inside. Before cutting, most workshops drain it by piercing one of the three “eyes” at the top of the shell with a spike or drill. This matters for two reasons: a liquid-filled shell is harder to cut cleanly, and any residual moisture left inside after cutting must eventually evaporate — slowing the drying step and creating an odor if coconut water sits in the interior while the shell is drying.
Step 2: Halving the Shell
The shell is halved along its equator using a hand saw or band saw. The cut runs through the widest circumference of the shell, producing two bowls from each coconut. This step sounds mechanical but requires some skill: an uneven cut creates a rim that is thicker on one side than the other, which affects both aesthetics and structural integrity. The rim is the thinnest point of the finished bowl and the first place cracks develop under stress. A clean, even equatorial cut starts that geometry off correctly.
Band saws produce a cleaner, more consistent cut at higher volume; hand sawing is slower but common in smaller workshops. Either way, shell splinters at the cut face are normal and are addressed in later sanding stages.
Step 3: Removing the Coconut Meat
The interior of a freshly halved shell carries dried coconut meat adhered to the shell wall. It needs to come out completely. Residual meat left on the interior will decompose under the finish, cause odor, and create a surface that cannot be sanded or sealed properly.
The most common removal method is manual scraping with a curved scraper or chisel. Some workshops briefly microwave the halved shell to loosen the meat from the shell wall before scraping — heat contracts the shell slightly relative to the meat, making it pull away more cleanly. The duration is short and workshop-specific; I have seen this described in guides but the exact time and wattage are not standardized and vary by shell thickness.
After scraping, the interior still carries a thin film of coconut oil and fibre. It needs washing, typically with water, sometimes with a mild detergent. Thorough washing at this stage is not optional: residual coconut oil on the raw shell will go rancid under any surface finish, producing the stale or sour smell that is one of the most common quality complaints on imported coconut bowls.
Step 4: Removing the Outer Husk (Coir)
The fibrous outer coir layer that surrounds the hard shell varies in thickness depending on maturity and variety. Most of it strips off during the harvesting and copra-processing steps before the shell reaches the bowl workshop, but residual coir fibres and the thin pithy layer between the coir and the hard endocarp need to be removed before sanding begins.
This is typically done with a combination of a knife or rasp to remove the bulk, then coarse sandpaper to smooth the outer surface down to clean shell. The exterior of a finished bowl — the natural dark-brown, striated outer surface — is the endocarp surface once this layer is fully removed and the shell grain is exposed.
Step 5: Washing and Air Drying
After cleaning and husk removal, the shells are washed again and then dried thoroughly before any sanding or finishing begins. This step is the most underappreciated in the coconut shell bowl manufacturing process, and skipping or rushing it is the root cause of the two most common failures in finished bowls: mold and cracking.
Shell is a natural, porous material. Moisture trapped inside the shell wall under a closed finish has nowhere to go. If a bowl is finished before the shell is completely dry, the residual moisture tries to escape after sealing, creating internal pressure that either cracks the coating, causes the bowl to warp, or in humid conditions encourages mold growth inside the shell wall itself. That mold can be invisible initially and appear weeks after the bowl arrives at a buyer’s warehouse.
Industrial producers use a combination of sun drying over several days and low-temperature drying rooms or ovens to accelerate and standardize this step. Small workshops rely on extended sun drying. The exact number of days required depends on ambient humidity, shell thickness, and airflow — specific drying times are not numerically documented in the public literature for this product, and suppliers who claim exact figures are almost certainly quoting their own practice rather than a verified standard. What matters is that drying is complete, not that it took exactly a fixed number of hours.
When evaluating a supplier, ask how they verify dryness before finishing begins. A credible answer involves moisture measurement or at minimum a consistent protocol. A vague “we dry in the sun” without further detail is worth following up on.
Sanding: The Grit Progression That Determines Surface Quality
Coconut bowl sanding and polishing is where the surface finish quality is built. The process follows the same logic as woodworking: start with a coarser grit to shape and remove material, work progressively finer to smooth the surface, and finish at a grit suited to the intended coating.
The Documented Grit Range
The grit range documented across multiple supplier and finishing guides for coconut bowls runs from 120 at the coarse end to 400 at the fine end. The full progression in practice works roughly as follows:
| Stage | Grit Range | Purpose |
|---|---|---|
| Shaping / material removal | 80–120 | Even out the cut face, remove husk remnants, establish bowl profile |
| Intermediate refinement | 180–240 | Remove scratches from coarse stage, smooth outer and inner surfaces |
| Final smoothing | 320–400+ | Food-contact surface preparation; produces the satin or glossy base that takes finish evenly |
For bowls intended for food contact, the interior surface should reach at least 320 to 400 grit. At that point, the surface is smooth enough that it does not trap food particles in micro-scratches, and it accepts an oil or lacquer finish without the uneven absorption that causes blotchy patches. Bowls sanded only to 120 or 180 grit will feel rough to the touch on the interior and will not hold a film finish evenly.
What Sanding Actually Reveals
Progressive sanding is also a quality-control step in itself. As material is removed, latent cracks that were invisible at the surface become visible. A workshop running proper QC will identify and reject shells with subsurface cracks at this stage rather than finishing over them. Finishing over a crack locks moisture into the defect and guarantees it will open further in the field.
The natural variation in shell colour, pattern, and grain also becomes fully visible once the outer surface is sanded. This is one reason no two coconut bowls look identical — it is not a defect, it is an inherent characteristic of a natural material. For buyers: specify acceptable colour range and pattern variation in your contract, not as a rejection criterion for natural variation, but to establish what constitutes a genuine finish defect (streaks from uneven sanding, dull patches from incomplete grit progression) versus the natural character of the shell.
The Coconut Bowl Finishing Process: Oil vs Film Coatings
Once the shell is fully dried and sanded to the target grit, it receives its finish. This is the most commercially consequential decision in the coconut bowl production process, and the one most obscured by marketing language. Two fundamentally different approaches exist.
Oil-Only Finishes
An oil finish penetrates the shell surface rather than forming a film on top of it. The most common oils used in this category are food-grade coconut oil, food-grade mineral oil, walnut oil, and occasionally beeswax as a secondary sealer. Refined coconut oil and food-grade mineral oil are themselves food substances and are generally accepted as food-safe on food-contact surfaces when uncontaminated and correctly applied.
The application is typically four to five coats, each applied and allowed to absorb before the next. The result is a surface that has some water repellency but is not waterproof. Oil finishes are compatible with biodegradable and plastic-free positioning because there is no synthetic film on the surface. They are also the most honest finish in terms of the bowl’s end-of-life: a shell finished only with food-grade oil can eventually decompose.
The durability trade-off is real. Oil is stripped by dishwasher detergents (not that coconut bowls should ever go in a dishwasher — they should not), and even by repeated hand-washing with strong soap. The surface will dull and roughen over time. To maintain appearance, the bowl needs to be periodically re-oiled. The re-oil interval is analogous to wooden cutting board care — roughly every few weeks under heavy daily use, less frequently with occasional use — but no coconut-bowl-specific interval has been independently measured.
One specific oil worth flagging: boiled linseed oil, sometimes used as a cheaper alternative, often contains metal-based driers added to accelerate curing. Those metal compounds mean boiled linseed oil cannot be assumed food-safe despite being a “natural” product. Raw linseed oil dries extremely slowly without the driers, making it impractical for production. For food-contact surfaces, food-grade mineral oil or refined coconut oil are safer and better-documented choices.
There is also a rancidity risk with non-drying vegetable oils. Coconut oil, mineral oil, and most food-grade oils used in this context are either saturated (slow to oxidize) or highly refined. But impure oil, oils stored poorly, or oil left in a warm, dark environment can go rancid over months — producing a stale smell that is one of the quality failures buyers associate with lower-grade bowls. The solution is using properly refined food-grade oil, fully absorbing each coat before the next is applied, and removing excess surface oil that can oxidize on the surface rather than inside the shell.
Lacquer and Film Coatings
A film-forming finish — lacquer, polyurethane, epoxy, or varnish — creates a physical barrier on the shell surface rather than penetrating it. The durability advantage is significant: a properly applied food-contact film finish resists water, staining, and abrasion far better than oil alone, and it maintains that resistance without periodic re-application.
The critical qualification, and the one most suppliers gloss over: generic hardware-store lacquer or varnish is not food-safe. Standard architectural or furniture lacquers are formulated for surfaces that do not contact food. They may contain solvents, plasticizers, or heavy-metal driers that are not cleared for food contact. At least one widely-cited guide for coconut bowl makers explicitly restricts standard lacquer to non-food use only.
For a bowl that contacts food, the film coating must be a certified food-contact coating: a product whose specific formulation has been tested and documented as compliant with the relevant food-contact materials regulations in the destination market (21 CFR in the US, Regulation (EC) 1935/2004 in the EU, EU 10/2011 for plastic films). “Food-grade lacquer” as a marketing term means nothing without this documentation. Ask for the coating product data sheet and the corresponding food-contact compliance letter from the coating manufacturer.
Film finishes also carry their own failure modes. If the shell was not fully dried before finishing, moisture escaping through the shell wall will blister or crack the film from below. If the coating is applied too thickly, it can crack as the shell moves seasonally with humidity changes. Flaking or peeling film finish is a food safety issue — coating fragments in food are a contamination concern, and the raw shell exposed under peeled coating is porous and absorbs liquids. This is why film-coated bowls that are not dishwasher safe fail fastest in a commercial kitchen environment: the heat and prolonged water contact that dishwashers apply will delaminate a film finish that would otherwise last for years under normal hand-washing.
For a complete look at how these finish decisions interact with food-safety certification requirements in the US and EU markets, see our food-safe finish and certifications guide.
Quality Control During Production
Good quality control on a coconut bowl is not a single inspection at the end; it is a series of checks woven through the coconut shell bowl manufacturing steps. The points where defects are most efficiently caught:
- At shell intake: incoming shell rejection for cracks, uneven wall thickness, immature shell, and insect damage. Anecdotal figures from small producers suggest incoming rejection rates of roughly 5 to 20 percent; no audited dataset exists, and these numbers should be treated as illustrative rather than established.
- After halving: check the cut face for hidden cracks radiating from the equatorial line, and evaluate rim evenness.
- After drying: check for warping (bowls that rock or have uneven rim height), and for any new surface cracks that opened during the drying contraction.
- After sanding: check for latent cracks now visible under the sanded surface, and for sanding consistency (dull patches or visible grit-change lines indicate incomplete progression).
- After finishing: check for finish adhesion, coverage evenness, odor (LFGB-level sensory evaluation can fail a bowl on smell alone), and interior smoothness to the touch.
Post-processing scrap from shell that passes intake inspection but fails at a later stage runs roughly 3 to 10 percent in anecdotal producer accounts — again, no audited dataset. For buyers placing container orders, specifying AQL sampling plans and explicit tolerance thresholds for crack length, rim variation, colour departure, and finish coverage in the purchase contract is the practical way to manage this. Our quality control and defects guide covers what to put in that contract and what a credible pre-shipment inspection covers.
Care After Production: What the Manufacturing Choices Mean for the End User
The production decisions made at each step have direct consequences for what the bowl can and cannot do in use. A few hard facts worth building into any product description or buyer guidance you publish:
- Dishwasher safe?
- No. Dishwasher temperatures of 60 to 70°C, combined with prolonged soaking and alkaline detergents, will crack, warp, and delaminate any coconut shell bowl regardless of finish. Hand-wash only, no soaking.
- Microwave safe?
- No. Localized heating inside the shell creates thermal gradients the material cannot absorb. Cracking and coating stress are the predictable results. This also applies to very hot food: filling a cold bowl with boiling liquid is thermal shock and is a common cause of rim cracking in service.
- Re-oiling required?
- For oil-finished bowls, yes. The interval depends on use frequency, but the bowl should be re-oiled when the surface feels dry or rough to the touch, not on a fixed schedule.
- Food use vs decorative?
- This depends entirely on the finish. An oil-only bowl with a confirmed food-grade oil is food-contact ready; a bowl with a generic lacquer finish is decorative use only unless the coating is documented as food-contact compliant.
If you are building product copy for retail, the distinction between “food-safe finish” and “food-grade certified coating” matters. Your supplier should be able to provide the coating data sheet, not just assert that the bowl is food safe. Ask for the documentation.
Production at Scale: What Changes
The steps above describe the process as it applies at any scale. What changes at higher production volumes is equipment, not sequence. Small workshops of two to five people saw and sand by hand or with angle grinders, dry in the sun, and apply finish by hand with cloth. Larger producers use band saws, disc sanders and drum sanders, drying rooms with controlled temperature and airflow, and spray or dip application for finish. The grit progression and the drying requirement do not change; the time to complete them does.
For buyers: volume capacity claims from suppliers should be evaluated against their actual equipment and staffing. A listing claiming “supply ability: 100,000 pieces per month” on a platform like Alibaba is a marketing figure. Ask for the production setup, lead time on your specific order quantity, and how drying is managed at that volume. Drying is the bottleneck in coconut bowl production: it cannot be meaningfully accelerated without risking quality, which is why lead-time pressure from buyers is one of the most common indirect causes of cracking and mold failures in shipped goods.
Our production lead times guide covers realistic scheduling from order confirmation to the vessel, and explains why padding the schedule is a quality decision, not a negotiation weakness.
Summary: What Good Production Actually Looks Like
A well-made coconut bowl starts with a fully mature, properly thick-walled shell, halved cleanly along the equator, scraped and washed free of every trace of meat and residual oil, and dried completely — not mostly, completely — before a tool touches the surface for sanding. The sanding runs from around 80 to 120 grit for shaping through 180 to 240 for refinement to 320 to 400 grit or finer for the food-contact surface. The finish is either a proper food-grade penetrating oil in four to five coats, or a film coating documented as food-contact compliant — not a generic hardware varnish applied because it produces a glossy photograph. Quality checks happen at each stage, not only at the end.
A bowl that skips or shortcuts any of those steps may look identical in a product photo. It will not last the same way in use, and it may not meet food-contact compliance requirements in your market. The production process is where the quality is built in, and it is what differentiates a supplier worth working with from one that ships what photographs well.
If you want our help sourcing from verified producers who can document their process — finish data sheets, drying protocols, QC tolerances — reach us on WhatsApp 6281139414563 or through our enquiry form. No one can pay us to change what we publish here; if you proceed with a partner we refer, they may pay us a referral fee at no extra cost to you.
Frequently Asked Questions
What type of coconut is used to make coconut bowls?
Only mature, brown coconuts. The hard endocarp shell of a fully mature coconut is dense enough to sand, finish, and use as a food vessel. Young green coconuts have thin, soft shells that cannot hold their shape once dried and are not suitable for bowls. Maturity is also what gives the shell its natural dark colour and the striated grain pattern visible in a finished bowl.
How long does the coconut bowl production process take?
The process itself — from halving through sanding and finishing — takes less time than the drying step requires. Complete drying before finishing is critical to prevent mold and cracking, and the time needed varies by shell thickness, ambient humidity, and drying method. Suppliers using drying rooms with controlled airflow can work faster than those relying on sun drying alone. Total production lead times from confirmed order are supplier-reported as roughly 15 to 30 days for plain bowls at 100 to 2,000 pieces; confirm in writing with any specific producer you work with.
What is the difference between an oil-finished and a lacquered coconut bowl?
An oil finish (food-grade coconut oil, mineral oil, or similar) penetrates the shell and leaves no film on the surface. It looks and feels more natural, is compatible with biodegradable end-of-life claims, but needs periodic re-oiling and is not waterproof. A lacquer or film coating sits on the surface, provides better moisture and abrasion resistance, and does not need re-oiling — but generic hardware lacquer is not food-safe. Food-use film coatings must be documented as food-contact compliant. The two finishes require different care instructions and meet different sustainability positioning claims.
Why do coconut bowls crack?
The most common causes are incomplete drying before finishing (trapped moisture creates internal pressure as it tries to escape), thermal shock from hot food or liquids poured into a cold bowl, and dishwasher exposure (heat plus prolonged soaking plus alkaline detergent). Cracks typically start at the rim, the thinnest point of the shell. A bowl that arrives cracked was almost always packed before it was fully dry, or was subjected to impact during shipping without adequate carton protection. Specifying complete pre-finishing drying and AQL inspection criteria in your purchase contract is the practical mitigation.
Are coconut bowls safe to eat from?
A bowl finished with a confirmed food-grade oil (refined coconut oil, food-grade mineral oil) on a fully cleaned and dried shell is generally suitable for food contact, subject to the finish chemistry being uncontaminated and correctly applied. A bowl with a film coating is food-contact safe only if the specific coating is documented as compliant with the applicable food-contact regulations in your market (21 CFR in the US, Regulation (EC) 1935/2004 plus EU 10/2011 in the EU, LFGB in Germany). “Natural” and “BPA-free” are not compliance claims. Ask your supplier for the coating product data sheet and accredited migration test report. This is information, not legal or food-safety advice — confirm requirements with the relevant authority and your own consultant. See our food-safe finish and certifications guide for the full framework.